You might be surprised to learn that there are dozens of types of vinegar. The most common vinegars found in American kitchens are white distilled and apple cider, but the more adventurous may also use red wine vinegar; white wine vinegar; rice vinegar; or gourmet varieties, such as 25-year-old balsamic vinegar or rich black fig vinegar.
Vinegar can be made from just about any food that contains natural sugars. Yeast ferments these sugars into alcohol, and certain types of bacteria convert that alcohol a second time into vinegar. A weak acetic acid remains after this second fermentation; the acid has flavors reminiscent of the original fermented food, such as apples or grapes. Acetic acid is what gives vinegar its distinct tart taste.
Pure acetic acid can be made in a laboratory; when diluted with water, it is sometimes sold as white vinegar. However, acetic acids created in labs lack the subtle flavors found in true vinegars, and synthesized versions don't hold a candle to vinegars fermented naturally from summer's sugar-laden fruits or other foods.
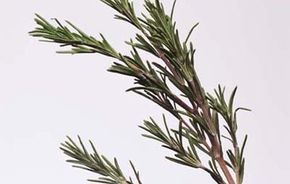
Vinegars can be made from many different foods that add their own tastes to the final products, but additional ingredients, such as herbs, spices, or fruits, can be added for further flavor enhancement.
Vinegar Varieties
Vinegar is great for a healthy, light style of cooking. The tangy taste often reduces the need for salt, especially in soups and bean dishes. It can also cut the fat in a recipe because it balances flavors without requiring the addition of as much cream, butter, or oil. Vinegar flavors range from mild to bold, so you're sure to find one with the taste you want. A brief look at some of the various vinegars available may help you choose a new one for your culinary escapades.
White Vinegar
This clear variety is the most common type of vinegar in American households. It is made either from grain-based ethanol or laboratory-produced acetic acid and then diluted with water. Its flavor is a bit too harsh for most cooking uses, but it is good for pickling and performing many cleaning jobs around the house.
Apple Cider Vinegar
Apple cider vinegar is the second-most-common type of vinegar in the United States. This light-tan vinegar made from apple cider adds a tart and subtle fruity flavor to your cooking. Apple cider vinegar is best for salads, dressings, marinades, condiments, and most general vinegar needs.
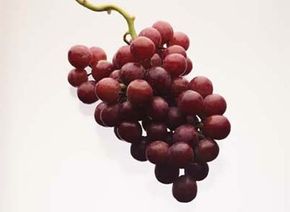
Wine Vinegar
This flavorful type of vinegar is made from a blend of either red wines or white wines and is common in Europe, especially Germany. Creative cooks often infuse wine vinegars with extra flavor by tucking in a few sprigs of well-washed fresh herbs, dried herbs, or fresh berries. Red wine vinegar is often flavored with natural raspberry flavoring, if not with the fruit itself.
The quality of the original wine determines how good the vinegar is. Better wine vinegars are made from good wines and are aged for a couple of years or more in wooden casks. The result is a fuller, more complex, and mellow flavor.
You might find sherry vinegar on the shelf next to the wine vinegars. This variety is made from sherry wine, and usually is imported from Spain. Champagne vinegar (yes, made from the bubbly stuff) is a specialty vinegar and is quite expensive.
Wine vinegar excels at bringing out the sweetness of fruit, melon, and berries and adds a flavorful punch to fresh salsa.
Balsamic Vinegar
There are two types of this popular and flavorful vinegar, traditional and commercial. A quasigovernmental body in Modena, Italy (balsamic vinegar's birthplace), regulates the production of traditional balsamic vinegar.
Traditional balsamic. Traditional balsamic vinegars are artisanal foods, similar to great wines, with long histories and well-developed customs for their production. An excellent balsamic vinegar can be made only by an experienced crafter who has spent many years tending the vinegar, patiently watching and learning.
The luscious white and sugary trebbiano grapes that are grown in the northern region of Italy near Modena form the base of the world's best and only true balsamic vinegars. Customdictates that the grapes be left on the vine for as long as possible to develop their sugar. The juice (or "must") is pressed out of the grapes and boiled down; then, vinegar production begins.
Traditional balsamic vinegar is aged for a number of years -- typically 6 and as many as 25. Aging takes place in a succession of casks made from a variety of woods, such as chestnut, mulberry, oak, juniper, and cherry. Each producer has its own formula for the order in which the vinegar is moved to the different casks. Thus, the flavors are complex, rich, sweet, and subtly woody. Vinegar made in this way carries a seal from the Consortium of Producers of the Traditional Balsamic Vinegar of Modena.
Because of the arduous production process, only a limited amount of traditional balsamic vinegar makes it to market each year, and what is available is expensive.
Leaf ratings. You might see that some traditional balsamic vinegars have leaves on their labels. This is a rating system that ranks quality on a one- to four-leaf scale, with four leaves being the best. You can use the leaf ranking as a guide for how to use the vinegar. For instance, one-leaf balsamic vinegar would be appropriate for salad dressing, while four-leaf vinegar would be best used a few drops at a time to season a dish right before serving. The Assaggiatori Italiani Balsamico (Italian Balsamic Tasters' Association) established this grading system, but not all producers use it.
Commercial balsamic. What you're more likely to find in most American grocery stores is the commercial type of balsamic vinegar. Some is made in Modena, but not by traditional methods. In fact, some balsamic vinegar isn't even made in Italy. Commercial balsamic vinegar does not carry the Consortium of Producers of the Traditional Balsamic Vinegar of Modena seal because it is not produced in accordance with the Consortium's strict regulations.
The production of commercial balsamic vinegar carries no geographical restrictions or rules for length or method of aging. There are no requirements for the types of wood used in the aging casks. It may be aged for six months in stainless steel vats, then for two years or more in wood. Thus, commercial balsamic vinegar is much more affordable and available than the true, artisanal variety.
Whether you're lucky enough to get your hands on the traditional variety or you're using commercial-grade balsamic, the taste of this fine vinegar is like no other. Its sweet and sour notes are in perfect proportion. Balsamic's flavor is so intricate that it brings out the best in salty foods such as goat cheese, astringent foods such as spinach, and sweet foods such as strawberries.
Rice Vinegar
Clear or very pale yellow, rice vinegar originated in Japan, where it is essential to sushi preparation. Rice vinegar is made from the sugars found in rice, and the aged, filtered final product has a mild, clean, and delicate flavor that is an excellent complement to ginger or cloves, sometimes with the addition of sugar.
Rice vinegar also comes in red and black varieties, which are less common in the United States but very popular in China. Both are stronger than the clear (often called white) or pale yellow types. Red rice vinegar's flavor is a combination of sweet and tart. Black rice vinegar is common in southern Chinese cooking and has a strong, almost smoky flavor.
Rice vinegar is popular in Asian cooking and is great sprinkled on salads and stir-fry dishes. Its gentle flavor is perfect for fruits and tender vegetables, too. Many cooks choose white rice vinegar for their recipes because it does not change the color of the food to which it is added. Red rice vinegar is good for soups and noodle dishes, and black rice vinegar works as a dipping sauce and in braised dishes.
Malt Vinegar
This dark-brown vinegar, a favorite in Britain, is reminiscent of deep-brown ale. Malt vinegar production begins with the germination, or sprouting, of barley kernels. Germination enables enzymes to break down starch. Sugar is formed, and the resulting product is brewed into an alcohol-containing malt beverage or ale. After bacteria convert the ale to vinegar, the vinegar is aged. As its name implies, malt vinegar has a distinctive malt flavor.
A cheaper and less flavorful version of malt vinegar consists merely of acetic acid diluted to between 4 percent and 8 percent acidity with a little caramel coloring added.
Many people prefer malt vinegar for pickling and as an accompaniment to fish and chips. It is also used as the basic type of cooking vinegar in Britain.
Cane Vinegar
This type of vinegar is produced from the sugar cane and is used mainly in the Philippines. It is often light yellow and has a flavor similar to rice vinegar. Contrary to what you might think, cane vinegar is not any sweeter than other vinegars.
Beer Vinegar
Beer vinegar has an appealing light-golden color and, as you might guess, is popular in Germany, Austria, Bavaria, and the Netherlands. It is made from beer, and its flavor depends on the brew from which it was made. It has a sharp, malty taste.
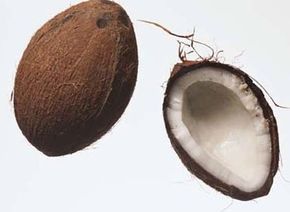
Coconut Vinegar
If you can't get your Asian recipes to taste "just right," it might be because you don't have coconut vinegar -- a white vinegar with a sharp, acidic, slightly yeasty taste. This staple of Southeast Asian cooking is made from the sap of the coconut palm and is especially important to Thai and Indian dishes.
Raisin Vinegar
This slightly cloudy brown vinegar is traditionally produced in Turkey and used in Middle Eastern cuisines. Try infusing it with a little cinnamon to bolster its mild flavor. Salad dressings made with raisin vinegar will add an unconventional taste to your greens.
Now that you've got the idea of the wide variety of vinegar flavors available, perhaps you are inspired to create your own. Go to the next page to find out how to make your own vinegar.