How to Make Yogurt

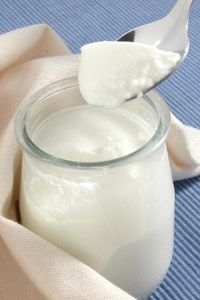
Homemade yogurt can be healthy, delicious and inexpensive.
iStockphoto.com/Joe Biafore

­Yogurt has been around since at least 2000 B.C. in the Middle East [source: Koenig]. If you think about what yogurt is at its core -- simply fermented milk -- it makes sense. Fermenting milk is a way of preserving it, and there were no refrigerators around in ancient times.

The acidic, or tart, taste of yogurt results from this fermentation. When milk is heated to produce yogurt, the harmful bacteria die­. Several "good bacteria," though -- the ones that fortify the digestive tract and aid in healthy bodily functions -- survive the heat. Two of the most common "active" (living) yogurt bacteria, Streptococcus thermophilus and Lactobacillus bulgaricus, react with fermenting lactose to produce acid during the yogurt-making process. This acid acts as a preservative, since disease-causing bacteria can't grow in acidic conditions.

Advertisement

­Centuries after it became possible to preserve milk with cooling systems, yogurt is still around. This is partly because lots of people love the taste. But it's also because the living bacteria in yogurt are healthy, as long as the yogurt contains "active cultures," which means these good bac­teria are still alive. You can buy these yogurts at the store, of course, although you have to check and see if they contain live cultures, since some yogurts are pasteurized to extend shelf life, and pasteurization by definition kills bacteria. To be sure you're getting the good stuff, though, and to save some money if you're a big yogurt fan, making your own at home can be a great choice.

It's not very hard, and you don't even have to go out and buy a special "yogurt maker." In this article, we'll take you through the most basic yogurt making process from start to finish, and then we'll find out how you can customize your yogurt to suit your specific tastes.

We'll begin with laying out the equipment. You've probably already got almost everything you need in your kitchen right now.

Advertisement

Yogurt-Making Preparation

Making your own yogurt is a simple process. You're basically just heating and cooling milk. But you have to closely control the temperature. Maintaining specific temperatures is the most important part of making yogurt at home. The other big deal is protecting everything from contamin­ation. You need to be careful to keep out bacteria that you don't want in there.

You'll want to gather up the following equipment to get started:

Advertisement

  • Double boiler: A large pot with a smaller pot that fits inside it; for our recipe, the small pot should hold at least 4 quarts
  • Large spoon: Metal or plastic (because you have to be able to sterilize it)
  • Food thermometer: Preferably one that can be attached to a clip so you can secure it to the double boiler
  • Incubator: A closed container that can maintain a fairly tight temperature range; this is what a store-bought yogurt maker does, but you can also use either a gas oven or a picnic cooler. We're going to use the oven method -- which means we also need an oven thermometer. (See Fias Co Farm's yogurt page for a description of other incubation methods.)
  • Measuring cup/spoons

And you should collect the following ingredients:

  • One quart of milk: Whole, skim or low fat, depending on your preference
  • Yogurt starter: Either a small container of plain yogurt (Dannon plain, with the latest expiration date you can find, is recommended) or a package of yogurt starter cultures
  • Nonfat dry milk powder: 1/3 cup if you're using whole or low-fat milk; 2/3 cup if you're using skim milk
  • Optional: Sugar, honey or fruit for sweetness, vanilla or coffee for flavor, gelatin for thicker yogurt

Once you've got all of this in your kitchen, it's time to start making yogurt. In this recipe, adapted from Making Yogurt at Home by Barbara Willenberg of the Department of Food Science and Human Nutrition at the University of Missouri, you're going to create a basic, tart, "plain" yogurt.

First up: sterilization.

Advertisement

Making Yogurt

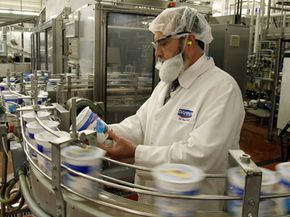
A rabbi inspects yogurt at a factory.
If you're in the mood for something different from factory-made yogurt, you can try cooking up your own at home.
AP Photo/Skip Peterson

­Protecting each piece of equipment from contaminating your yogurt is a crucial first step, because you don't want any unwanted microorganisms in there to contaminate the process. Remember, it's ­all about the right bacteria.

Step 1: Sterilize

Advertisement

Thoroughly wash all of your equipment -- the boiler, the spoon, measuring cups, the thermometer and the container(s) that will hold your finished product. Run everything through the dishwasher, do it by hand with soap and hot water or kill a couple of birds with one stone and just boil everything in the boiler.

Also now, preheat your oven to 200 degrees F (93 degrees C). Once it reaches 200 degrees F, turn it off. While you're preparing the yogurt, make sure the oven stays above 100 degrees F (37.8 degrees C).

Step 2: Set Up

Fill the larger pot of the boiler with water so that it reaches about halfway up the outside of the smaller pot when you insert it.

Also now, fill your sink with several inches of ice water.

Step 3: Heat

Pour the quart of milk into the smaller pot and place the double boiler on the stove with the thermometer inserted into the milk. Heat the milk, stirring lightly, to 200 degrees F (93.3 degrees C). Keep it there for about 10 minutes, careful to maintain the 200 degrees F temperature.

Step 4: Cool

Remove the boiler from the heat and place the smaller pot (with the milk) into the cold water bath in your sink. (The water should not be high enough to get in the pot.) Keep watching the thermometer. When the milk's temperature is between 112 degrees F and 115 degrees F (44.4 and 46.1 degrees C), remove the pot from the water.

Step 5: Add

Remove 1 cup of milk from the pot and blend it with 1/4 cup of the plain yogurt or with the appropriate amount (see package) of packaged yogurt starter culture. Pour the combined liquid back into the milk pot. The milk should be at or around 111 degrees F (43.9 degrees C).

Step 6: Incubate

Quickly pour the warm milk into the container(s) you've pasteurized to hold the yogurt. Place the containers in the oven, which needs to stay between 108 degrees F and 112 degrees F (42.2 and 44.4 degrees C), so keep reading your oven thermometer, and turn the oven off and on to stay in that temperature range. You'll incubate the yogurt for 4 hours.

Step 6: Refrigerate

Remove the container(s) from the oven and immediately put them in the refrigerator. It'll keep for between one and two weeks.

That's it -- your most basic yogurt recipe. On the next page, we'll look at what else you can do to customize your homemade yogurt.

Advertisement

Yogurt Varieties

A cup of yogurt.
With variations on the basic recipe, you can make yogurt to meet your culinary needs.
­iStockphoto.com/AlfPhoto

­There are lots of recipes out there for different styles of yogurt, including custard-style, traditional Middle Eastern and drinkable. You just have to do a quick Internet search or look in a recipe book. The process we've described in this article is a great starting point, though -- and if you like plain yogurt, which is nice and tart (and great combined with the sweetness of granola or berries), you're all set. This is also where you stop if you use your yogurt in baking (like for lemon yogurt cake), or in savory Middle Eastern style dishes like chilled cucumber-yogurt soup or traditional Indian dishes like tandoori chicken.

But lots of people prefer sweeter yogurt. If you're one of them, you can simply add some sugar or honey to the milk before heating it in Step 3. For thicker yogurt (many commercial brands are thicker), just add some gelatin powder to the milk before you start -- sprinkle some onto the milk and let it sit a few minutes before you start heating it. Other ways to go include adding vanilla, coffee, maple syrup or chocolate. On the next page, you'll find a link to yogurt recipes where you can experiment with different additives.

Advertisement

And of course, who can forget the "fruit on the bottom" variety? For your own special fruity yogurt concoction, cut up some of your favorite fruit and stir it into the yogurt when you refrigerate it. Strawberries, raspberries and blueberries work well to sweeten and texturize your finished product. You can also add vanilla, coffee or even chocolate. That's the best part of making your own -- no constraints!

For more information on yogurt and related topics, look over the links on the next page.

Advertisement

Lots More Information

Related HowStuffWorks Articles

  • Fankhauser, David B., Ph.D. "Yogurt Making Illustrated." U.C. Clermont College. http://biology.clc.uc.edu/Fankhauser/cheese/yogurt_making/yogurt2000.htm
  • Koenig, Vicki, MS, RD, CDN. "Yogurt's History and Folklore." Stonyfield Yogurt. http://www.stonyfield.com/wellness/MooslettersDisplay.cfm?moos_id=16
  • Reeps, Michael W. "How to Make Yogurt." MakeYourOwnYogurt. http://www.makeyourownyogurt.com/
  • Willenberg, Barbara J., Karla Vollmar Hughes, Lyn Konstant. "Making Yogurt at Home." Department of Food Science and Human Nutrition, University of Missouri-Columbia. http://www.chetday.com/howtomakeyogurt.htm

Advertisement

Loading...