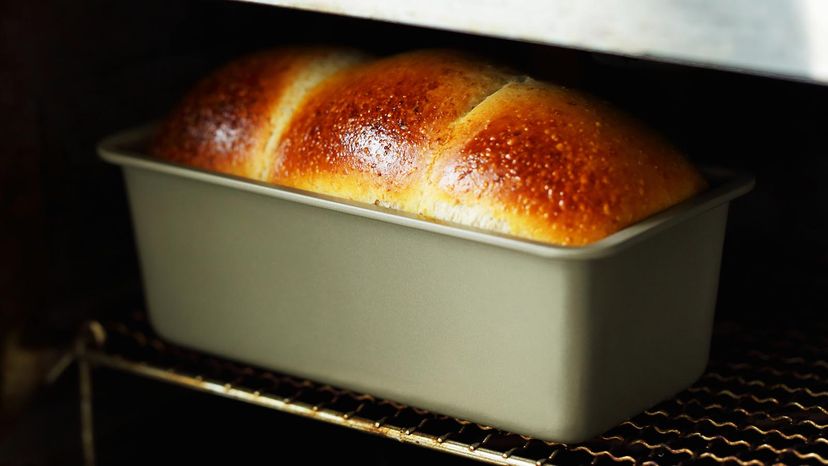
Homemade bread is delicious if you know how to make it properly. We'll give you the step-by-step. kumacore/Getty Images
Around the world, bread is the "stuff of life." It's an important part of nearly every cuisine and almost every meal. And nothing beats the satisfaction of serving loaves of your own homemade bread. Making bread for the first time can be a bit scary, no matter how many cooking shows and famous chefs you've watched on television. But preparing your own yeast bread — the familiar white, wheat, rye or multigrain loaves we slice for everything from our favorite French toast recipe to Cuban sandwiches — isn't really difficult. It simply requires a few unique skills beyond those usually called for in other recipes.
So throw out that old bread machine and become a citizen of the bread-making world. First let's start with some bread baking 101.
Advertisement
Baking Bread 101
Yeast-leavened bread makes up much of the bread available in bakeries and supermarkets. These breads contain yeast as a leavening agent. There are two different kinds of yeast breads: yeast-batter breads and yeast-dough breads. Yeast-dough breads are what we think of when think about dough. To make dough, you have to first proof the yeast, knead the dough and let the dough rise. (More about those processes in a bit.)
Quick breads, on the other hand, are leavened with baking powder, baking soda or steam. As their name suggests, they are quick and easy to make. You're probably familiar with quick breads like banana bread, pancakes and muffins. And if you want to really get adventurous, we've included a step-by-step on how to make and braid Challah, the Jewish festival bread that is as lovely for the table as it is delicious for the mouth.
But let's get started with dough. It's where all good breads begin.
A good bread has to start with a good bread dough. Ross Woodhall/Getty Images/Cultura RF
OK. You know you want to make bread. You know that it involves yeast. But the big question: What is yeast? And, what does it have to do with dough? Bread contains yeast as a leavening agent. It's what causes the dough to rise and what gives the bread shape, volume and texture. The most common type of yeast used in bread making is active dry yeast. Each package contains thousands of microscopic living plants that are activated by warm liquid and fed by sugar and starch. When activated, live yeast releases carbon dioxide gas bubbles. When these bubbles become entrapped in the dough, it rises.
Step 1: Proofing the Yeast
But before you can make bread dough, you have to proof the yeast. Proofing the yeast makes certain that the yeast is still alive and active before it goes in the dough recipe. Yeast that is not alive won't make bread rise.
Advertisement
To proof the yeast for baking bread:
Check the expiration date on the yeast package. Replace if necessary.
Heat the liquid to 105-115 degrees Fahrenheit. Use an instant-read thermometer to determine if the liquid has reached the proper temperature. If the dissolving liquid is too cold, the yeast action is retarded. If the liquid is too hot, it kills the yeast.
Measure out the specified amount of warm liquid and pour it into a small bowl.
Sprinkle the specified amounts of yeast and sugar over the warm water; stir until the yeast is dissolved.
Let stand 5 minutes or until the mixture is bubbly, indicating the yeast is alive and releasing gas bubbles.
If the yeast does not bubble, discard the mixture and start again with new ingredients.
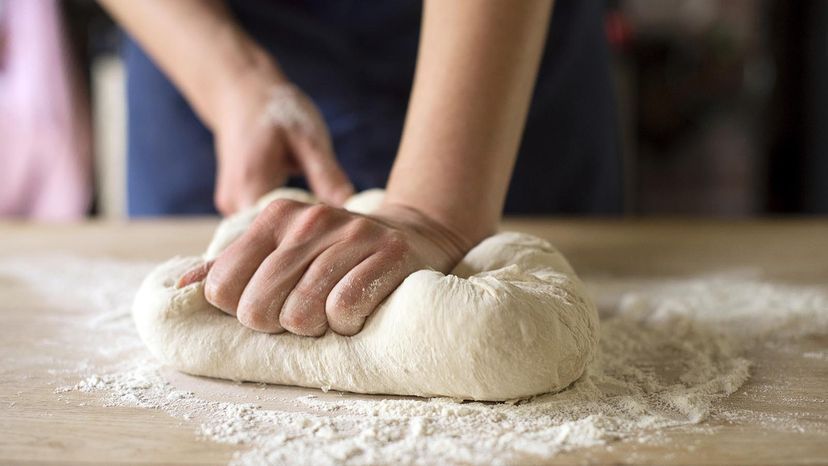
Step 2: Kneading the Dough
Once the ingredients have been combined in the mixing bowl, most yeast dough needs to be kneaded. Kneading develops and strengthens the gluten, a protein in flour that gives the bread its structure. Gluten forms an elastic network that traps the carbon dioxide gas released by the yeast. Kneading also incorporates and homogenizes the ingredients and gradually makes the dough smoother and more elastic.
Bread dough can be kneaded using an electric mixer with a dough hook attachment or a food processor. These methods work well for stickier, batter-type dough that is difficult to knead by hand, such as sweet yeast breads that contain more sweeteners and fat. Follow the manufacturer's instructions.
To knead dough by hand for baking bread:
Lightly sprinkle flour on the kneading surface and your hands to make the dough easier to handle.
Flatten the dough slightly and fold it in half toward you.
Push the dough away from you with the heels of your hands in a rolling motion.
Rotate the dough one-quarter turn and repeat the folding, pushing and turning steps for the length of time specified in the recipe.
(Clockwise from top left) Sprinkle flour on your hands and work surface to make kneading easier; flatten and fold dough in half; roll with the heels of your hands to push the dough; rotate the dough and repeat, according to bread recipe.
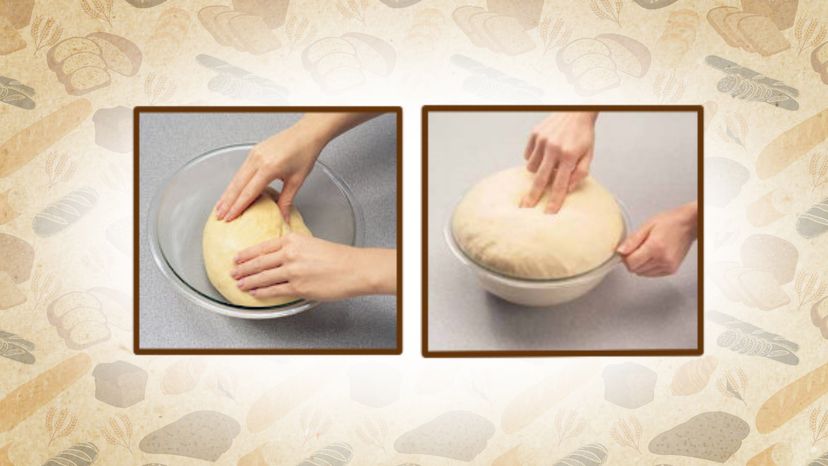
Now that all the ingredients are thoroughly combined, the yeast needs time to do its work. Letting the dough rise allows time for the yeast cells to give off carbon dioxide gas. The process gradually expands and develops the dough in flavor, texture and structure. To allow the dough to rise for baking bread:
Place the dough in a large greased bowl and turn it over so all surfaces are greased. This prevents the dough from drying out or developing a crust. (Leave stickier, batter-type yeast dough to rise in the mixing bowl.)
Cover the dough with a clean kitchen towel and set in a warm place (80-85 degrees Fahrenheit) away from drafts.
Let the dough rise until it has doubled or almost doubled in bulk. Use the time guidelines given in the recipe.
To test if the dough has risen enough, lightly press two fingertips about one-half inch into the dough. The dough is ready if the indentations remain when your fingertips are removed.
(L-r) Roll the dough around in the greased bowl to cover all surfaces; if the bread dough has doubled, the marks from your fingertips will remain.
Alternative method to allow the dough to rise for baking bread: Letting dough rise in a colder environment slows the process, offering the convenience of beginning a recipe one day and completing it later that day or the next. For the refrigerator rising method, cover the dough with greased plastic wrap and set it in the refrigerator for 3 to 24 hours. Bring the dough to room temperature before shaping or baking.
Once the dough has doubled, it needs to be punched down. The next section tells you how to do just that.
Breads Worth Baking
Oatmeal-Raisin Bread
Honey Wheat Bread
Basic White Bread
Rye Bread
Punching Down and Finishing the Bread
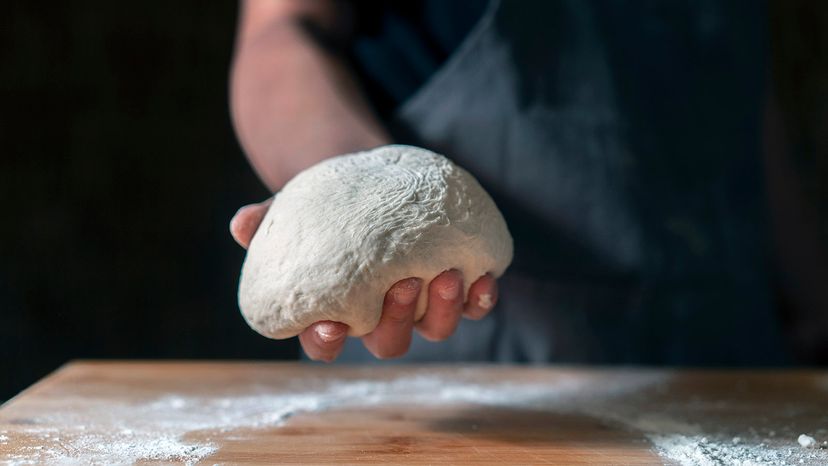
The final step in making a great homemade bread dough is to form it into a nice ball and prepare it according to your recipe. Zhang Peng/Getty Images
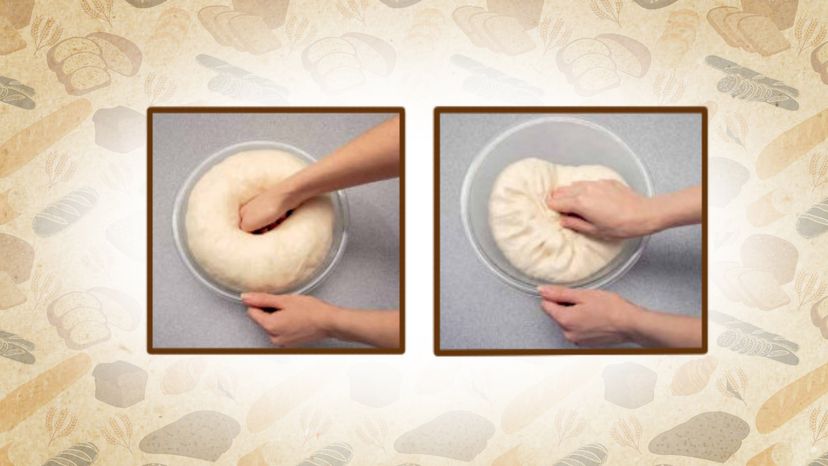
Now that your dough has doubled in size, it's time to get out your aggression and punch it back down. That's because the dough is full of air pockets. To work out the excess carbon dioxide and redistribute the yeast, simply "punch" the dough down with your fist. (A side benefit is that it helps people feel more calm after a stressful week.)
Step 1: Punching Down the Dough
To punch down the dough for baking bread:
Advertisement
Push down the center of the dough with your fist. (Soft, sticky dough is stirred down with a wooden spoon rather than punched.)
Push the edges of the dough into the center using your fingertips. The dough is now ready to rise again or to shape, depending on the bread recipe you are using.
(L-r) Punching down the dough removes air pockets; when all the dough is rolled back into the center, it's ready to rise again.
Most recipes call for rolling, cutting or shaping the dough after it has risen. This provides the bread with a structure — which you can shape to your desires.
To shape and finish dough for baking bread:
Lightly flour the rolling surface and rolling pin before working with the dough. If only a portion of the dough will be used at a time, keep the remaining dough covered with a towel to keep it from drying out.
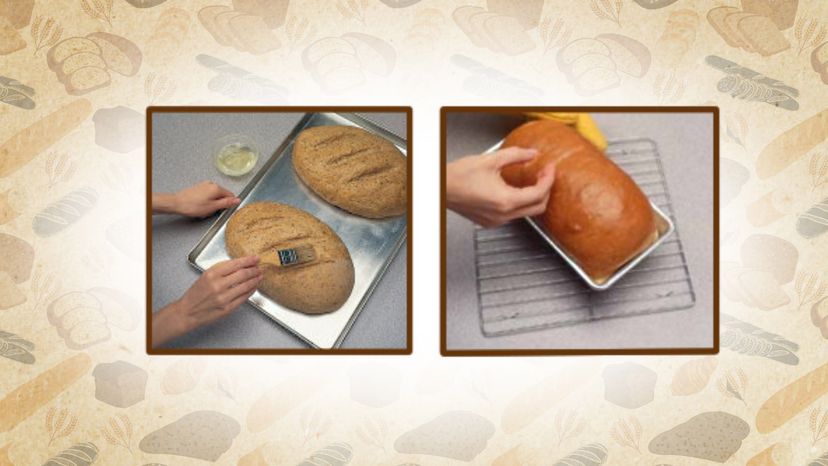
To change the look and texture of the crust, you can brush on a variety of ingredients either before or after baking.
For a shiny crust, brush with one egg white beaten with 1 tablespoon water before baking.
For a soft crust, brush melted butter or margarine over the crust immediately after baking.
For a crisp crust, mist unglazed breads quickly with water several times during the first 10 minutes of baking.
Bake bread as specified in recipe.
(L-r) Brush on beaten egg whites before your bread goes into the over for a shiny crust; when your bread comes out of the oven, tap the bread top with your fingers. A hollow sound means it's done.
Once your bread is baking, you can sit back, chill out and enjoy the blissful aromas wafting from your oven. But don't get too relaxed — you need to make sure not to overcook your creation by testing for doneness.
To test breads for doneness when baking:
To test breads for doneness, tap the tops of the loaves with your fingers or a wooden spoon. A hollow sound means the bread is done; a dull thud means that the bread is moist inside and requires more baking. Breads baked in loaf pans will shrink away from the sides of the pans slightly.
Remove yeast breads from pans immediately and cool completely on wire racks to prevent a soggy bottom.
Breads Worth Baking
Whole Wheat Loaves
Savory Summertime Oat Bread
Bran and Honey Rye Breadsticks
Cheddar Pepper Bread
Quick Dough Breads
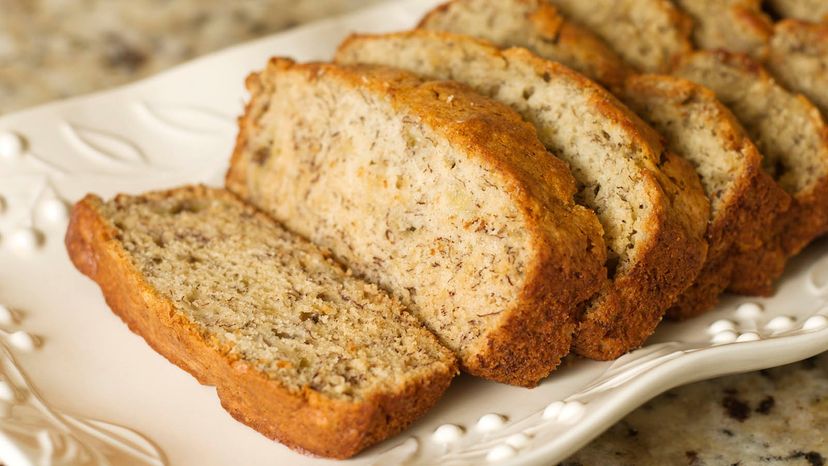
Banana bread is one of the easiest (and tastiest) quick breads to make. Strevell/Getty Images
Biscuits and scones are the most common quick dough breads. Solid fat, such as butter, margarine or shortening, is cut into dry ingredients to start the process. These breads may be kneaded very briefly to bring the dough together for shaping. Too much kneading will make the breads mealy and tough.
To make quick dough breads:
Advertisement
Cut the solid fat into the dry ingredients until the mixture resembles coarse crumbs.
Add the combined liquid ingredients and stir the mixture just until the dough clings together.
Biscuits and scones are ready to eat when their top and bottom crusts are an even golden brown color. Follow specific cooling instructions in each recipe.
Quick Batter Breads
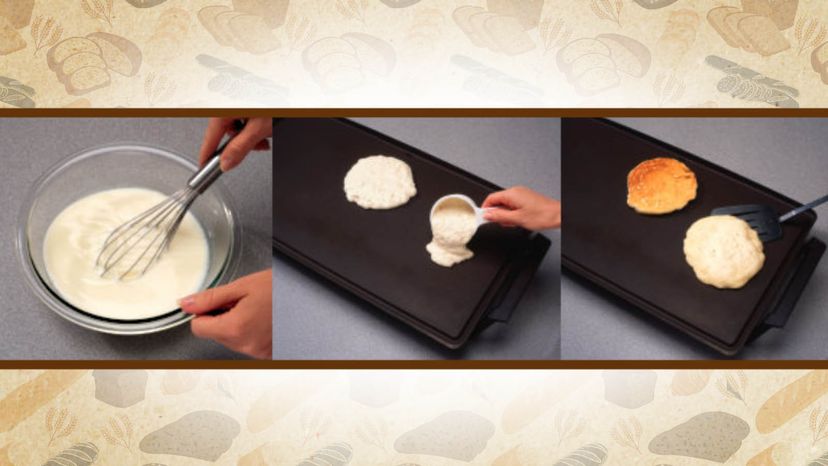
Muffins, coffee cakes, tea breads and pancakes are the most popular quick batter breads. Pancakes, also known as flapjacks, are one of the world's simplest and versatile forms of bread.
To make quick batter breads:
Add the combined liquid ingredients to the combined dry ingredients and stir only until the mixture is evenly moistened.
Pour onto prepared pans. The batter should look lumpy; too much stirring or beating will give the breads a tough texture with lots of holes and tunnels.
If cooking pancakes, flip to cook on both sides.
These quick breads are completely baked when a wooden toothpick inserted near the center comes out clean. Follow specific cooling instructions in each recipe.
(L-r) Stir until mixture is evenly moistened; batter should look lumpy when poured; flip pancakes for even cooking.
Store quick breads in plastic bags at room temperature for up to three days. Freeze them tightly wrapped in freezer bags or heavy-duty foil for up to three months. Reheat frozen breads wrapped in foil in a 300-degrees Fahrenheit oven for 15 to 18 minutes.
Quick Breads Worth Baking
Whole-Grain Banana Bread
Healthy Zucchini Bread
Walnut Cheddar
Apple Bread
Skinny Cornbread
Challah Bread
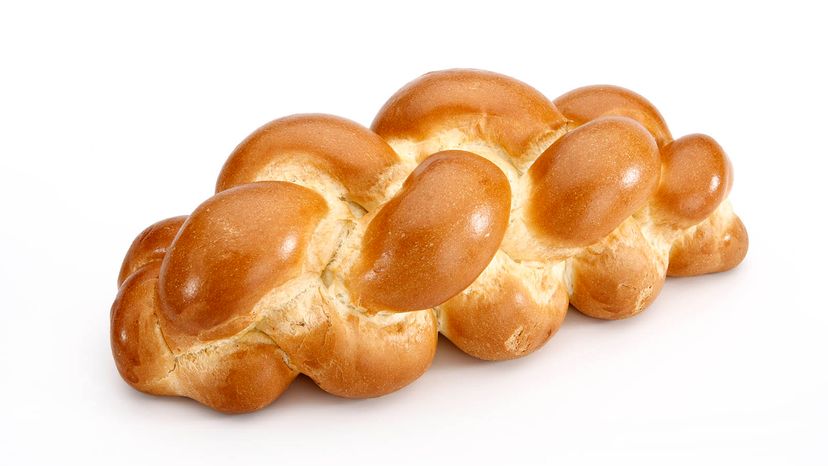
Challah bread dough is enriched with eggs and oil, and a few tablespoons of sugar add some sweetness. kgfoto/Getty Images
Challah is a beautiful, braided egg bread traditionally served at the Shabbat meal and during most Jewish holiday feasts. Braiding the dough is really quite simple and a delightful way to finish a bread.
To braid challah:
Advertisement
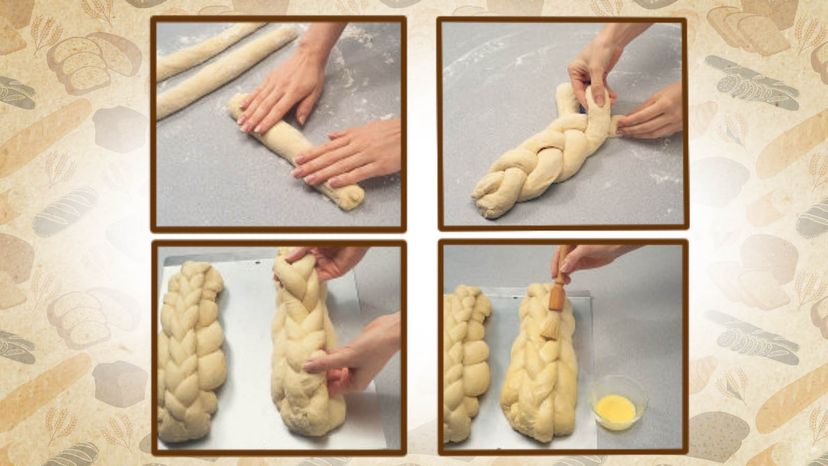
Prepare dough according to recipe. Divide the dough into 3 pieces on a floured surface. Cut one piece into thirds; roll each third into a 16-inch-long rope using your hands.
Place the 3 ropes side by side and braid; pinch both ends to seal and place to one side on a large greased cookie sheet.
Repeat with another piece of dough for the second loaf. Place alongside first loaf — at least 5 inches apart — on cookie sheet.
Cut remaining piece of dough in half; cut each half into thirds. Roll each third into 17-inch ropes using hands.
Place ropes side by side and braid; pinch both ends to seal.
Carefully place braid on one of the braided loaves on the cookie sheet, stretching top braid if necessary. Tuck ends of top braid under bottom braid. Repeat with remaining dough.
Cover braided loaves with clean kitchen towel. Let rise in warm place away from drafts per recipe or until doubled in bulk.
Beat 1 tablespoon water into an egg yolk. Brush tops and sides of loaves with egg mixture.The egg wash gives challah its characteristic sheen.
Bake according to recipe until bread is brown and loaves sound hollow when tapped with a finger.
(Clockwise from top left) Gently roll the dough into a rope
without using too much pressure; make a neat braid that is neither too tight nor too loose; gently stretch the top braid, if needed, so you can tuck under both ends; brush with egg wash.
At this point, there's only one more step to go and it's the easiest of all — slicing off a piece of your freshly baked bread and enjoying it with fresh butter or fruit preserves.
Cite This!
Please copy/paste the following text to properly cite this HowStuffWorks.com article: